Gabriel Knight Sins Of The Fathers Anniversary Walkthrough
For Gabriel Knight: Sins of the Fathers 20th Anniversary Edition on the PC, GameFAQs has 1 FAQ (game guide/walkthrough), 51 cheat codes and secrets, 51 achievements, 2 reviews, and 20 critic reviews.
. This is a large & graphically intensive guide. Please allow a few moments for it to load.Gabriel Knight 20th Anniversary Edition has many changes from the original released two decades ago. Mostly subtle differences, but important ones, making the 20th Anniversary Edition uniquely different from the original. Plays out in such a way you could almost consider this a 'Director's Cut'.There is a lot of story in this great classic adventure game, split episodically across 10 days.This guide doesn't cover all the possible things to explore, nor does it explain all of the story or side conversations you can engage in. There is much more to Sins of the Father than is covered in this walkthrough.This guide is designed to help you out when you get stuck. To quickly find the right part you are up to and solve the missing piece to the puzzle.
If you use this guide from start to finish without doing it for yourself, you will really miss so much this great game has to offer.Don't rush to the end, and off course, have fun! Soak it in till you start speaking like a southerner, and call New Orleans, 'Nnarr'lns':)There are 362 points to achieve in the game, along with 51 Steam Achievements (including all hidden achievements) all of which are listed in the guide.Each step where you earn a point will also be numbered in the solution (eg. 123 / 362) to help you efficiently find where you are stuck or what you may have missed. You can also enlarge most of the pictures if you need by clicking on it to see more details.Enjoy Gabriel Knight, and if you found my guide helpful, please show me some 'Thumb Love!' :)New to Gabriel Knight?
You can find out a little more en.wikipedia.org. George's Book Store2 / 362 - Talk to Grace, ask for your messages. You will get news that Mosely has left a package for you at the Police Station.
Ask for your messages two more times to get messages from Wolfgang Ritter & Grandma.4 / 362 - Talk to Grace, ask about Voodoo Research. She will tell you about the Dixieland Drugstore & The Historical Museum of Voodoo locations.Go through the other Grace conversations as you wish.5 / 362 - Pick up the Sketchbook in the Box from Grandma.6 / 362 - Look at the Sketchbook.7 / 362 - Use the Newspaper on Day 1. This will trigger your first achievement!9 / 362 - Use the Bookshelf. Read World of Snakes & Das Lyrik by Heinz Ritter.11 / 362 - Look at the Counter. Pickup the Tweezers & Magnifying Glass.Feel free to browse the other knick-knacks.12 / 362 - Use the Cash Register. Pickup the Gift Certificate.Go to the Bedroom.14 / 362 - Pickup Hair Gel from the Bathroom Cabinet.15 / 362 - Pickup the Black Shirt from the Colset.16 / 362 - Pickup the Flashlight from the Dresser.Exit back to the Store.
Exit out to the front of the Store.Travel to the Police Station. Enter Police Station. Jackson SquareSpeak to the idle Police Office leaning on the Bike.Look around the square, you will find a Mime artist harassing park patrons. Look at his behaviour, you will notice he follows people around.Your Journal will also tell you that you need to get the Police Officer away from the Bike.25 / 362 - Walk up to the Mime. When close he will begin to follow you. Lead him like a silly lemming down to the Police Officer. When in range, the Mime will start to act like a Monkey & Police Officer will chase him away.
Note: If you lead him past another park patron, he will stop following you and start following them. Try to avoid other people till you get the Mime to the Police Officer.This will trigger the achievement:Now don't take too long on the next step.27 / 362 - Use the Radio on the Bike & listen in.Exit Jackson Park & then the Greater New Orleans Map.Travel to Lake Pontchartrain. Lake PontchartrainAs you enter the scene you will start talking to Mosely when Malia Gedde rolls up in her car. This will trigger the achievement:When the Cops leave, look at the Marks in the ground to the left of the Blood.29 / 362 - Equip your Sketchbook from your Inventory. Use the Sketchbook on the Markings to make a copy for later.30 / 362 - Look at the Tracks to the right of the Blood.
Use the Tracks. Sonic dash 2 sonic boom free online episodes. This will zoom in as you investigate for clues. Travel North a couple of clicks and you will see something glimmering.32 / 362 - Equip the Magnifying Glass and Investigate, then Equip the Tweezers and pick the Scale up. This will trigger the achievement:33 / 362 - Pickup some Clay from the Bank of Lake Pontchartrain.
You will need this later.Exit the Crime Scene & Travel back to French Quarter.Travel to St. George's Book Store.
Police StationTalk to Frick & ask to see Mosely. He will let you through.38 / 362 - Before entering Mosely's Office, adjust the Temperator via the Control Panel on the wall to the maximum setting (80.1). It's time to mess with Mosely:)Enter Mosely's Office.You will notice Mosely is taking off his jacket when you enter due to the heat.39 / 362 - Talk to Mosely, ask about the Patterns. Mosely will reveal there is a series of other patterns from other crime scenes, then ask about the other 6 patterns.
Mosely will give you permission to view the other patterns by speaking to the photographer Franks.43 / 362 - Ask Mosely for a Coffee. He will grumble a bit then leave to get you a cup. While he is away, Use the Coat and take the Police Badge (Naughty Gabriel!). This will trigger the achievement:45 / 362 - When Mosely returns with your Coffee, the conversation will continue.
Exit the conversation with Mosely and leave the office to speak to Franks the photographer. Ask to see the Case File.
Franks will tell you that you can read it but cannot leave or copy it.Head back into Mosely's Office and Talk to Mosely again.There are lots of conversations to explore with Mosely on the Voodoo Murders & personal life among others. Complete these before asking about the Photographs last.47 / 362 - Ask Mosely about the Photographs. This will result in Mosely asking if there is anything else Gabriel needs for the book. Choose the Cop/Autor photograph option. Franks will enter the room and you will buddy up with Mosely for a photo. When you are done taking the photo say you need to go and check your hair. Leave Mosely's Office.52 / 362 - Pickup the Voodoo Murders Case File on Frank's Desk & Use it in the Photocopier.53 / 362 - Put the Case File back on Frank's Desk.
Return to Mosely's Office and take the final picture.Leave the Office, and the Police Station. This will trigger achievement:Take a look at the photocopy Case File markings from the other Crime Scenes.
We need to find someone who can make sense of these markings. We don't have a clue yet where this might be so lets cross off the locations we know we need to visit first.From Day 1, remember Grace told you about 2 locations that Gabriel should visit to find out more about Voodoo. These were the Dixieland Drug Store and the Historical Museum of Voodoo.The Museum sounds most promising, so that is our next destination.Travel to the Voodoo Museum.
Voodoo MuseumTake a look around.55 / 362 - Use the Coffin, this will bring up a close up view. Take the Magenta Moonbeam flyer on the wall. This will open up a new investigation location on the map, although this is not available till the 22nd.Try the Switch next to the front door. You will notice this turns the fan on, but also causes the Snake in the back corner to get agrivated. Remember this for later.57 / 362 - Talk to Dr. John, ask about Voodoo.
He will ask if you want to learn more about Historical Voodoo or Current Voodoo. Choose Historical Voodoo. Listen to what Dr. John has to say and select Historical Voodoo four more times to get the full story. This will reveal Marie Laveau.59 / 362 - Ask Dr. John about Current Voodoo.
This will also open up the Hoodoo conversation.61 / 362 - Ask Dr. John about Marie Laveau. You will discover that there were a mother and daughter named Marie Laveau. John about Marie Laveau one more time and he will reveal the Cemetary where they are buried.Explore ALL the other conversations with Dr. The topic should disappear once you have heard everything the good doctor has to say.
Once you have heard all that Dr. John has to share, this achievement will trigger:Leave the Voodoo Museum.Before we go to the new map locations, lets double back and quickly pay a visit to the Dixieland Drugstore. Dixieland DrugstoreAfter Madame Cazaunoux with her yappy dog finishes talking, take a look around.Specifically, make sure Gabriel looks at the Crocodile Mask next to the door.62 / 362 - Look at the Sign on the counter. Take a closer look to read.64 / 362 - Talk to Willy, ask about the Animal Mask.66 / 362 - Talk to Willy, ask about Voodoo Murders.
Catching him off-guard he reveals a clue, by saying 'Cabrit Sans Cor' (French). Sounding very defensive.
Push the topic with Willy by asking about Cabrit Sans Cor.Complete the other conversations.Leave the Drug Store.Travel to St. Louis Cemetery. Malia Gedde's Mansion74 / 362 - Knock on the front door, and Talk to the Butler who answers the door. Request to see Malia Gedde. He will deny access to you unless you have official business.
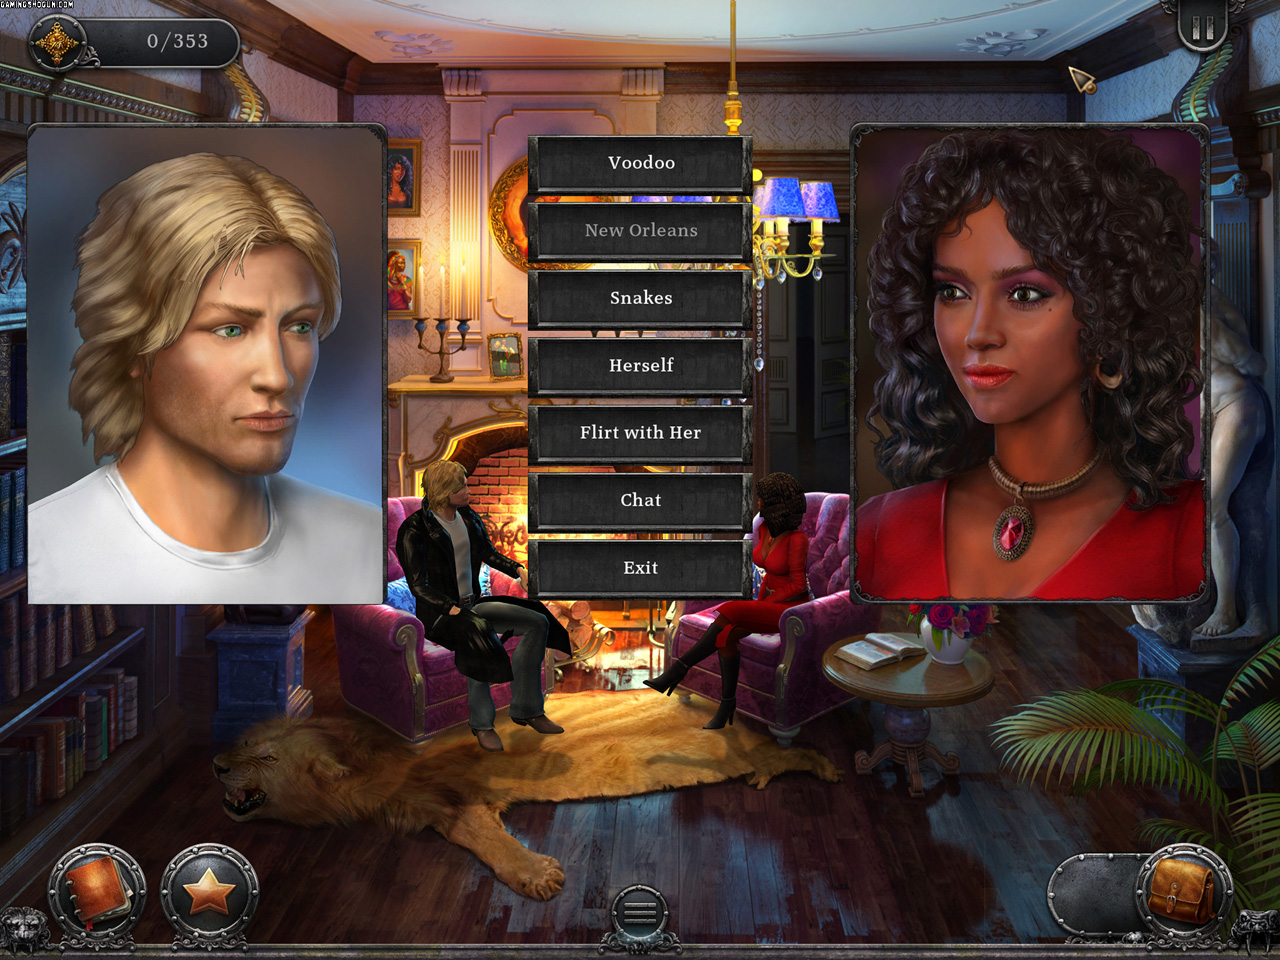
Equip the Police Badge you stole from Mosely and Show the Butler. He will grant you entry.You will be taken to the meeting room, where Malia Gedde subsequently joins you. You can make some small talk by talking about the art & sculptures.Talk to Malia, ask about the Lake, then talk about any of the other topics you want. Leave the 'Flirting' till last otherwise you will not be able to come back to the other options later (you will see why). Ask her twice about Voodoo.76 / 362 - When you have explored everything else, start flirting with Malia a couple of times. She will figure you are not a Police Officer and you will be asked to leave.This will trigger the achievement:Leave the Mansion grounds.
Enough of the distractions, time to try to figure out what these patterns you photocopied from the Police Station are all about. For this we need to Travel to Jackson Square, the last location to explore. Jackson SquareSome new vendors & patrons fill Jackson Square on your second visit. There is a Tap Dancer Kid and Hotdog Vendor to the bottom left, and an Artist at the top right.Have a quick Talk with the Tap Dancer, who will tell you he will do requests for food or money.
Hotdog Vendor appears to be related to the Police Officer from yesterday and will not help you.Ok, now head to the Artist. This will trigger the drawing getting blown off the pedestal and getting stuck near the Statue of Andrew Jackson (Center).Talk to the Tap Dancing Kid, ask if he can get through the fence to get the drawing for you. He says he needs money or food.77 / 362 - Equip the Gift Certificate from your Inventory.Turn around and Talk to the Hotdog Vendor, until Gabriel asks for a Doobie Dog. After being convinved, the Vendor will give you a Hotdog.78 / 362 - Give the Doobie Dog to the Tap Dancing Kid, he will now do a special request for you.79 / 362 - Ask the Tap Dancing Kid for a special request - Get the Drawing from behind the fence.80 / 362 - Head north to the Artist. Give him the Drawing.
Artist asks if there is anything he can do to return the favor. Talk to the Artist if you wish.82 / 362 - Equip the Photocopy of the Markings you got from the Police Station. Give it to the Artist.
He advises he needs more parts of the picture to complete the reconstruction.83 / 362 - Equip the Sketch you made of the Markings from the Crime Scene at Lake Pontchartrain. Give it to the Artist.
He advises he has enough to complete the reconstruction and that we should come back tomorrow. Excellent!All done here, let's head back to St. George's Book Store. George's Book Store86 / 362 - Grace will introduce Day 3 by letting you know what she found out about Madame Cazaunoux. She has a list of addresses and we need to figure out the right one. You will receive the Phone Book Page of the listings.Talk to Grace, ask for your Messages.
Mosely called advising they have a suspect.88 / 362 - Read the Newspaper for Day 3. This should trigger the section on the University Lecture, and make it an availble location.Go to you Bedroom.Equip the Phonebook Page, and Use the Phone.Dial the four numbers to find the right Cazaunoux residence.Once completed, this will trigger the achievement:90 / 362 - Dial the Cajun Critters Veternary Clinic. Cazaunoux is a client. When prompted to prove you know her, choose the response concerning Castro (her dog).
You will be given the address.Leave the Bedroom & the Store.Travel to Jackson Square. Time to see what the Artist has discovered. Jackson SquareHead to the top right where the Artist is located.91 / 362 - Talk to Artist.
He will be spooked at what he has seen in the completed drawing and is happy to give it to you.Go to the left to Madame Lorelei. Sit down and have a chat, ask about the Snakes.
You will notice she gets very protective and will not tell you who she got the Snakes from. End the conversation.93 / 362 - Move close to her and she should get up and start dancing to the Cajun Band. While she is dancing, press the Use button. This should start a sequence where she drops her Veil. Pick it up.95 / 362 - Use the Magnifying Glass on the Veil. You will discover another Snake Scale.
Pick it up.96 / 362 - Talk to Madame Lorelei again. Return her Veil. She is appreciative and offers you a free palm reading (as a friend). What she sees spooks her and she runs off.
This will trigger the achievement:97 / 362 - Take a closer look at the new Snake Scale. Gabriel will note it is a different Snake Scale thank found at Lake Crime Scene.Exit Jackson Square, time to swing back by St. George's Book Store and inform Grace of the latest developments.98 / 362 - Talk to Grace, Request Research on the Pattern you found.Exit St. George's Book Store, and visit the Police Station - time to see what suspect Mosely has caught.
Cazaunoux ResidenceBefore you knock on the door. Go to your Inventory, and Combine the Black Shirt and Priest Collar. Make the Collar & Shirt active and click on Gabriel.
He will indicate he needs to do his hair to fit the disguise.108 / 362 - Combine the Collar & Shirt with the Hair Gel.110 / 362 - Equip the Priest Disguise from your Inventory, Click on Gabriel and put the disguise on.111 / 362 - Knock on the door, Say you are Father MacLaughlin and Madame Cazaunoux will let you in.Equip the Clay.113 / 362 - Explore the conversations, leaving the Cambrit Sans Cor' to last. Ask about Cambrit Sans Cor'. When prompted, answer 'Goat without Horns'.Ask Madame Cazaunoux about Human Sacrifice. Follow the conversation and ask about the Real Voodoo Queens and then the Voodoo Hounfour. She will tell you a secret, and ask you to bless a Snake Bracelet.115 / 362 - Bless the Snake Bracelet. Once you are finished, use the Clay from the Lake on the Snake Bracelet.This will trigger the achievement:Exit the Cazaunoux Residence, Travel to St.
Louis Cemetery. George's Book Store121 / 362 - Gracie begins to talk to you after your coffee, telling you about what the Research on the Pattern uncovered.
Turns out there was a series of murders in 1810 with the same pattern! Suspicious indeed. Just like the guy staring at you through the window of the Book Store.122 / 362 - Read the Newspaper for Day 4. You discover that they have closed the case on the Voodoo Murders! Also reveals the Sam Springleton, Master Jewler at the Napoleon's House location.125 / 362 - Talk to Gracie, ask for your Messages.
Your Granda called and wants you to stop. Get the second Message from Gracie, another from Wolfgang Ritter (from Germany).
Ask Gracie for his phone number. Exit the conversation to receive the phone number.Let's find out why the Voodoo Murders case has been closed by paying Mosely a visit at the Police Station. Napoleon's House149 / 362 - Talk to the Bartender, explore the conversations finish by asking him about Voodoo and then Sam & Voodoo.150 / 362 - Give Sam the Voodoo Oil (Master Gamblin' Oil).He will pause his Chess game and follow you to the bar. Tell Sam that it is what Markus uses, and is why he wins all the time.
Tell him its powerful voodoo oil and then that it could make a NUN get lucky!152 / 362 - Sam is convinced! He uses the Voodoo Oil & time lapses to him winning the game. He offer to do you a favor for helping him out. This will also trigger the achievement:.153 / 362 - Time to cash in that favor with Sam straight away. Equip the Clay Mold of the Bracelet you made and Give it to Sam.
Sam is honored to help out and said to check back with him later today.Exit Napoleon's House, lets kill some time while Sam gets to work.Important Note: There have been several reports in the comments, that sometimes the points around these steps do not trigger if you do not follow things in the right order. If this happens you may need to restart the chapter (or earlier) and try again.
Please double check your points before proceeding.Some explaination below. Originally posted by Alexvn:Getting the same problem with 152 / 154 that was mentioned here already. Giving a mold to Sam gets me from 152 to 153 instead of 154 (I've tried multiple times with saving and loading).
If I go to Jackson Square Lookout immediately after that, using the binoculars gets me to 156 so it catches up.Now if you are like me and not following this guide to the letter, you may have visited Jackson Square Lookout before going to Napoleon's House and the catching up thing never happens. This is how you can miss one point.I am not sure what is causing it.
Also, missing a point if you have visited Jackson Square Lookout and used binoculars before giving a mold to Sam - looks like a bug to me.Travel to Jackson Square Lookout. Cathederal158 / 362 - Show Crash your Snake Bracelet. He will talk to you now.160 / 362 - Ask Crash about the Drummer.
This will reveal some more secrets.Ask Crash about the other topics, leaving Voodoo HounFour till last.161 / 362 - Ask about the Voodoo Hounfour. Crash dies, tormented by the voodoo snake eyes.This will trigger the achievement:163 / 362 - Look closer at Crash. Lift up his Shirt.
Equip your Sketchbook and make a copy of the Tattoo.Ok lets not hang around. Exit the Cathederal.Travel back to St. George's Book Store. George's Book Store. Important Update: There has been reports post the latest patch that calling Ritter before requesting the research from Gracie will not trigger the research request.
If it doesn't work for you, please reload and complete step 167 before 166.166 / 362 - Go to the Bedroom and Use the phone. We can now call Wolfgang Ritter.Dial (011) 490-9324-3333He will tell you to come to Germany, Gabriel refuses so Wolfgang says he will send a Journal for Gabriel, that is very important.167 / 362 - Talk to Gracie, request Research on Rada Drums.That will conclude Day 4 and trigger the achievement:End of Day 4.
Voodoo MuseumWhen you enter the Museum something is wrong!The lights are out and no one is answering you. Whats that.!179 / 362 - The Snake will attack you.
Remember the Switch from Day 2? Use the Switch to scare the Snake away. John will come in and seem none too worried about your brush with death and promptly kicks you out.
Museum is closed for the rest of the day.This will trigger the achievement:Gabriel needs to regroup after his near death experience, so Travel back to the St. George's Book Store. George's Book StoreAfter your tangle with the Snake, Gracie will notice you have something glimmering on your face.
She will pick it off and put it in the Ashtray on the Desk.180 / 362 - Equip the Magnifying Glass and Inspect the Ashtray.181 / 362 - Equip the Tweezers and Pickup the Snake Scale.183 / 362 - Time for some more detective work. This Snake Scale looks very similar to the one we got at the Lake Crime Scene.
Open your Inventory, and Combine the two same coloured Snake Scales. It's a match!Ok, we have a few things out of the way, but we still need to convince Mosely to reopen the case with the evidence we have found & the Magenta Moonbeam is finally open today. Lets gather all the evidence we can before we head to the Police Station.Travel to the Magenta Moonbeam. Magenta MoonbeamOnce you are greeted you will sit down. Show her the Voodoo Code you scribbled down from the Cemetary. She will tell you she knows how to read it but won't for outsiders like Gabriel. Show her the Veve, and she will comment it is strong magic.184 / 362 - Talk to Magenta, ask about Grimwald (the Snake).
If you ask her for a scale she will decline, but she will demonstrate handling the snake while she dances:)186 / 362 - While she is dancing, Pickup the Snake Skin in the Cage.187 / 362 - Inspect the Snake Skin.Gabriel will find that these are different scales, which means Magenta is not a suspect.189 / 362 - Talk to Magenta again, ask about St. Johns Eve.Ask Magenta about Voodoo Code again. Gabriel will convince her to give him a chance.
This will start puzzle for asking the LOA Machine for permission.If you press the Start button on the left, you will see two words appear as the machine cycles through different characters. These words are 'Trusted' (First Row) & 'Friend' (Second Row).The puzzle works by you pressing each of the coloured knobs at the bottom to spell out 'Trusted Friend'. There are 13 knobs and 13 letters, but its not quite that simple.Tip: You will notice some knobs only change one letter in the puzzle, where as others change two.
Use these combinations to tweak your letters shown. It takes a little trial and error, but I would recommend starting from one end and working across then trying to correct the remaining letters that are wrong one at a time till completed.192 / 362 - Solve the puzzle! Once you complete the puzzle, Magentia will decode the Voodoo Code for you.You will also receive the achievement:Finish off any other conversations you want, and also remember to Look at the Voodoo Code page translation.This will read, 'DJ Conclave Tonight Bring Fwet Kash'. DJ doesn't mean Disc Jockey:), its actually referring to Dr.
Johns and Fwet Kash is the name of a type of whip used for voodoo rituals ( clue: this is mentioned at the university lecture).' Johns, Conclave Tonight, bring the Whip'. Seems he is more involved than he is letting on.Exit from Magentia Moonbeam's place.Travel to the Police Station.
Police StationEnter Mosely's Office.Talk to Mosely, about Crash's & Hartridge's Deaths. You will try to convince Mosely that they are related. Its not enough.We need to establish they are related & real voodoo, and show they are a threat. We also need to find a lead.
Exit the conversation.Convince Mosely the Voodoo is real:194 / 362 - Equip the Notepad Sketch that you acquired at Hartridge's office, Show Mosely, its proving the symobolism used in the killings are real. Mosely is starting to pay attention.196 / 362 - Equip the reconstructed drawing the Artist created in the Square showing all the parts together and Show Mosely. Mosely is impressed! He is convinced its voodoo.Convince Mosely they are a Threat:198 / 362 - Equip the Voodoo Newspaper article from 1810 that Grace found, and Show Mosely. Mosely will now believe they are a threat. They have kiled before and they will kill again.Give Mosely a Lead:200 / 362 - Show the Combined Scales to Mosely, giving compelling evidence of a new lead at the Museum. Mosely will Reopen the Case.This will also trigger the achievement:Leave the Police Station will conclude the day.End of Day 5.
Nightmare are back last night and to make matter more intense its St. John's Eve.201 / 362 - You wake to find Grace has found a bloody chicken on the Store floor. Someone sending you a message? You clean it up.A letter is delivered.202 / 362 - Read the Newspaper for Day 6. Will tell you where St. John's Eve is traditionally celebrated and a rather ominous horrorscope.203 / 362 - Pickup the Envelope.205 / 362 - Open the Envelope.It will reveal a note from Mosely and an Office Key. Mosely says there may be something in his office that is helpful.Leave the Book Store, Travel to the Police Station.
Police StationYou will notice a car parked out the front of the Police Station. Busier it gets every day it seems.Enter the Police Station. Frick will prevent you from entering Mosely's Office. Talk to Frick and he will explain why. Bit concerning. Exit the Station.206 / 362 - Use the Car out the front of the Station.
Pickup the Tyre Iron near the dead Crow behind the car.208 / 362 - Walk behind the parked car into the Alleyway to the left of the screen. Use the Tyre Iron on Mosely's Window to gain access.This will trigger the achievement:Not much else you can do in the Office, so head to the Desk.210 / 362 - Use Mosely's Key (from the Envelope this morning) in the Desk.211 / 362 - Pickup the Tracking Device. This will start a cutscene of Gabriel being chased!You will now be at the French Quarter Map.Ok we need to hide out for a while.Travel to the Cemetary.
CemeteryLook at the Markings on the side of Marie Leveau Tomb. Gabriel will notice they are changed.213 / 362 - Equip your Sketchbook and take a copy of these new Markings.
This will appear as Voodoo Code Page 2.215 / 362 - Using the translated Voodoo Code Page 1 you got from Magentia, Combine Page 1 & 2. This will translate Page 2.
We now only have 3 codes missing.This translation reads:Page 2: DJKEEPE.ESONGKB.TDONOTHAR.In English. 'DJ Keep E.es On GK b.t do not har.'
Rest we need to guess:'Dr. Johns, keep eyes on Gabriel Knight, but do not harm.' Also remember from yesterday the Page 1 message: 'Dr. Johns, Conclave Tonight, bring Fwet Kash'.I think its time to pay Dr. Johns a visit.Travel to Voodoo Museum.
Jackson SquareLooks like Madame Lorelei is back from her freak out session a few days back.221 / 362 - Talk to Madame Lorelei. She will warn you to stay away from Maria Gedde or you will pay with your life!
Then she disappears.Walk up to the Drummer who will not talk to you (the one you caught Crash with earlier). Equip the Rada Book, and Use on the Drummer.You can now attempt to translate the message from the Drummer. Wait for the full sequence to finish and then you can begin.There are 3 pages of words to symbol translations, with a 2 line code presented by the drummer.Doesn't appear to make much sense, but consider it a find-a-word. There are a number of the works from the Rada Book hidden in the Drummer code.Tip: There are 3 words.Tip: Take special note of the patterns on the pages of symbols in the book. See each page always starts with a particular symbol. This means that each word hidden in the text will start with one of these symbols.Tip: Start with the first character, find the first of the three hidden symbols.
Go to that page and find the word that fits. Continue for the next two words.226 / 362 - Following the tips above, decode the Drummer message as pictured on the right. The code is 'Concave, Tonight, Swamp'.Once decoded, it will trigger the achievement:Nothing further to do here, so lets swing back to the Cemetary and see if we can figure out more of this Voodoo Code.Travel to the Cemetary. George Book StoreYour keen observation skils, you would have noticed that Grace has an Art Briefcase next to her at the desk. We need to look part of the tribe at the Conclave tonight, so Equip the Snake Tattoo, and Talk to Grace.234 / 362 - Grace will ask what this is for.
You need to reply its for a 'Costume Party' & respond to Grace not wanting to help because of Malia by saying 'If you are Jealous'. It will go to cutscene as Grace paints your tattoo.Exit the Bedroom & Exit the Store.Travel to the Bayou St. JohnsYou start out in the parking area. Enter the Bayou.Narrator will give you a clue to pull out the tracking device.Equip the Tracking Device, and follow the direction of the dot.
Do the opposite you would do in any Alien game:)237 / 362 - Reach the entrance of the Ceremony. This will take 4-6 screens approximately.241 / 362 - Equip the Crocodile Mask.
Gabriel will take off his shirt and shoes and join the Ceremony. Failing to do so will get you killed!Now is the time in the game to see if you have been paying attention to the story.Dr.
Brother Eagle will ask you some questions to prove your loyalty.You have a limited time to answer.Answer incorrectly and you will be killed!You can retry off course:)1) Name the great serpent who crushes all in its coils? Damballah2) Who is the destroyer of men? Ogoun BadagrisThis will trigger a long cutscene as Gabriel witnesses all sorts of animalistic things. Then he sees Malia in the Ceremony. Passes out.End of Day 6. CemeteryGo to the right to Gedde's Tomb.
You will now notice a button available on the tomb wall which will grant you entry.247 / 362 - Use the button on the tomb. You will enter a dark room.248 / 362 - Go to your Inventory & Equip the Torchlight, and then Use it on Gabriel or the Darkness. Once activated, Move the mouse pointer to look around.On the far left wall there is an Ossuary.Use the Ossuary.
This will zoom in.250 / 362 - You will see 5 gems in the eye sockets of the skulls. Press them in the right order. Your hint is dangling off the bottom of the skulls.Correct order is Nth, Sth, West, East, Middle.This will open one of the burial chamber without a name, only a Veve.252 / 362 - Use the burial chamber. You are in for a surprise!Gabriel is knocked out from behind.When he comes to it will trigger the achievement:Open up the burial chamber again. Mosely is gone, but his wallet remains.255 / 362 - Pickup Mosely's Wallet, then Open the Wallet. This will uncover an American's Repressed Card (Credit Card).Press the Red Button on the right side wall to Exit the Gedde's Tomb.Exit the Cemetery.There is nothing further to do at any of the locations today.Travel to St. George's Book Store.
George's Book StoreOn returning Grace urges you to get out of town before it is too late and also tells you that you missed a call from Wolfgang. He said he found what he was looking for and that Schloss Ritter is mine now. Gabriel doesn't know what this means. Perhaps best to follow Grace's advice.Travel to the Bedroom.Pickup the Phone. When you select this Gabriel will announce he has a Travel Agent number on the phone page he has. How fortunate:)260 / 362 - Dial 555-0113 to call the Travel Agency. Ask how much it is for Ritterberg, Germany.
When agent asked how you want to pay, choose Charge It. Mosely wont be missing the money.You can pickup your tickets at the New Orleans International Airport (now available on the Greater New Orleans map).Exit the Bedroom & Store, Travel to the Airport. You awake in the Bedroom, you haven't slept well & feel no different after the Initiation Ceremony.275 / 362 - Glimmering on the end of the bed is the mysterious key you envisioned the night before. Did Gerde put this here?
Pickup the Key.278 / 362 - Use the key in the door.You have discovered the Library. Time to do some research and locate Wolfgang.Have a look around, you can check out a few of the categories of interest, but they won't get you closer to your goal.Use the muddled up Shield on the right hand side wall. A new puzzle to solve.Simply click on one square and then click on another to swap the pieces around. I found it easiest to start from the center, then work outwards.280 / 362 - Once solved, a secret passage way will open up, triggering the achievement:Enter the hidden room. Once inside you will see it's the Shattenjager Trophy room.
'Fracking Awesome!' 281 / 361 - Pickup the People's Republic of Benin. It will lead you to another book, The Primal Ones, back in the main Library.282 / 362 - Go to the Sociology Section and Use to read The Primal Ones.
It will detail some more important knowledge, and lead you to another book called Ancient Roots of Africa.283 / 362 - Go to the History Section and Use to read Ancient Roots of Africa. More background on the origins of all the bloodshed, leading back to a tribe of Sun Worshippers.284 / 362 - Go to the Religion Section and Use to read Sun Worshippers. Uncovers more and recommends reading Ancient Digs of Africa.285 / 362 - Go to the Archaeology Section and Use to read Ancient Digs of Africa. Here you will learn about the Great Snake Mound.
In the Red Basin, Benin. Its a double snake formation, said to be hiding a temple beneath.This will trigger the achievement:Talk to Gerde, ask her about the Key then Exit.DO NOT ask her about the Snake Mound book otherwise you will miss out on the next point. Fixed 2.02 (Thx LeisureX)286 / 362 - Use the Snake Mound Book on Gerde. She is astounded!287 / 362 - Gerde will arrange a ticket to Africa, but first will ask you how you want to pay!? Choose whatever you want, but to proceed you need to use Mosely's Credit Card (thanks again buddy!).This will conclude, your very short day as a bookworm.End of Day 8. After getting your ticket, you travel to Africa and the Snake Mound.
You are taken there by a local driver.Enter the Snake Mound where you will encounter a series of rooms.You would have noticed from the shape of the Snake Mound that the rooms are built in a circular shape. You can go either clockwise or anti-clockwise, both will lead back to the exit.
There are 12 rooms in total (picture it as a clock).Travel to each of the rooms. Pick up each of the Tiles you see.288 / 362 - Pickup the Snake Rod on the ground.There are 10 Snake Tiles in total. Once you pickup all of them it will trigger the achievement:Keep travelling around until you return to the starting point (where the exit is).Now we have all the Tiles and the Snake Rod, we need to figure out how to place these in the slots etched in the walls, so we can explore the inner circle of the mound.Look at the Snake Tiles, you will notice each is numbered by the number of snakes present in the Hieroglyph. This is a clue on where to place them. Example pictured is Number 9.You will also see that you are missing two Tiles for numbers 7 and 12 (hence 10 Tiles for 12 rooms).From your starting point, travel clockwise to the next room.
This unique room shows a mural (door), and has a Tile already locked in place. Take a close look at this tile and count the number of snakes. You should get 7.
If you keep heading clockwise, you will also come across another room with a Tile locked in place with 12 snakes present.You should be able to deduct from this where to start placing the Tiles correctly, simply start from either 7 or 12 rooms and keep going adding the next Tiles in the set in each room.291 / 362 - Place all the 10 Tiles in the right slots.If you are not already there, go back to the Exit room (Room 6).All you have to decypher is the Snake Rod, and where to place it. In the center of each Tiles you would have noticed there is a hole. This is where you need to place the Snake Rod, but which room out of the 12?Equip the Snake Rod.Although the most logical location seems to be in Room 7 (with the Mural/Door), this will not work.There have been multiple clues throughout the game to point you in the right direction, to save just using trial & error. Remember the Clock puzzle? Remember the German Poem? Remember the number of Snakes in Gabriel's dreams? Let's try Room 3.
Head counter-clockwise (Exit to Previous Room) for 3 rooms.IMPORTANT: Make a Savegame here. There are some dangers ahead!
Be ready!296 / 362 - Use the Snake Rod in Snake Tile 3.I think Gabriel has awakened something. The Mummies come alive!Our objective here is to get to Room 7 & the door to the inner wheel of the Mound.Move quickly and avoid the Mummies!In Room 5, navigate Gabriel to the outer edge first then select the door to Room 6.298 / 362 - In Room 6, surrounded by 3 Mummies, use the Vines in the middle of the room to get through.This will trigger the achievement:300 / 362 - Use the Snake Rod in the opening inside the door frame. Be quick or you will die!After a totally Indiana Jones move, you reach the Inner Wheel.Take a moment to recover and Talk to Wolfgang.301 / 362 - Use the Lid, Wolfgang will try to help you but its no use. Would need 10 strong men!You will see 2 long bars on the wall.302 / 362 - Use one of the Bars, Wolfgang will help place it in the Lid.303 / 362 - Use the second Bar.Wolfgang will explain that to unlock the Lid it will need a human heart (a sacrifice in blood). Wolfgang suggests to try one of the Mummy hearts, skeptical Gabriel goes to find out.Travel to the left of the screen and you will see a dead Mummy. Equip the Dagger, and Use on the Mummy.This will trigger a tragic cutscene, and conclude the day.313 / 362 - Found it! You now have the Talisman.End of Day 9.
George's Book StoreOn arriving home to St. George's Book Store, you discover Grace has been kidnapped!314 / 362 - Pickup the Note, left on Grace's desk.
It's from Malia, Tetelo has taken her over, and has kidnapped Grace to force you to give the Talisman back.After reading the Note, you will be hit with a surprise! After explaining things, you both go to the Bedroom to talk.Talk to Mosely.
Fill each other in, explore the other convos. Do the right thing and give Mosely his Credit Card back.316 / 362 - Make a Plan with Mosely. Need to catch the Gedde's with some hard evidence and Mosely said he can take it to the FBI. You give the Tracking Device back to Mosely, and plan to place it at the entrance of the Hounfour once Gabriel finds it. Together you will save Grace, get the evidence and get out.Exit the Bedroom.317 / 362 - Quickly catch up on the local news on your way out, Read the Newspaper for Day 10. Old habits die hard.Travel to Jackson Square and take a look around.
Nothing out of the ordinary here, so lets widen the search to the Cathederal. Did I miss something?Could I improve this guide?Your constructive feedback is welcome!. Please give me a 'Thumbs Up' if you found this guide helpful.AUSSIEDROID'S CURATOR @AUSSIEDROID'S WORKSHOP CONTRIBUTIONS @. 1.5 (23rd Jul 18) - Rem. Warning, Snake Mound Day 8 & Flashlight Day 7 (fix 2.02) (Thx LeisureX).
1.4 (14th Mar 17) - Updated 127 Grandma's Boy Achievement. Thx TITOMOSQUITO187. 1.3 (19th Jun 16) - Add warning Day 4, possible issue with 166/167. Thx DarthGonzales. 1.2 (15th Feb 16) - Add warning for possible bug Day 4, point 153/154 not triggering.
Thx Alexvn. 1.1 (26th Jul 15) - Multiple refinements & minor corrections. Thx jonbeton. 1.0 (30th Jun 15) - Corrections to 5.2 & 6.2. Thx ab.er.rant.
0.9 (30th Oct 14) - Fixed Step 362. Thx FnordScored23.
0.8 (28th Oct 14) - Fixed Steps 248, 267-268. Thx wowdane & kn. 0.7 (24th Oct 14) - Completed 8-10 + Published. 0.6 (23rd Oct 14) - Completed Day 7. 0.5 (22nd Oct 14) - Completed Day 6. 0.4 (20nd Oct 14) - Completed Day 4 & 5.
0.3 (19th Oct 14) - Completed Day 2 & 3. 0.2 (18th Oct 14) - Completed Day 1. 0.1 (17th Oct 14) - Initial Draft creation (Unpublished).
Layout & Basics. Thanks Aussiedroid for this incredible walkthrough + 100% achievement guide.
As of 15th October 2019, I can verify that this guide is still valid and I just got my 100% achievements by following the walkthrough to the latter. The only problem I encountered was with the 166 and 167 issue. Calling Wolfgang before requesting the research from Gracie prevents me from talking to Gracie, so I had to do 167 (request research from Gracie) first, then call Wolfgang (166).
Hope this helps anyone else playing this incredible adventure game! Thanks Aussiedroid again for your amazing effort to compile this.
Gabriel Knight 1: Sins of the Father Walkthrough
By mbday630
08/12/2012
This walkthrough assumes you have already played GK1 and know how to use the icons. This is just a basic outline of what sequences to do on what day to get that extra point. I still don't know what triggers the extra point, but, if you follow this, you should get the extra point. If anyone figures out what thing triggers it, please post on the forum.
DAY 1
Pick up magnifying glass.
Pick up tweezers
Read paper
Ask grace about messages and more messages until everything given
Open up cash register and take coupon
Read book on snakes and poem (two books)
No points given, but it might be important, read books on left too.
Go behind curtain to bedroom and get hair gel and flashlight
Go to Dixieland drug store and LOOK at sign on desk.
Ask man behind counter about voodoo murders and get cabrit sans cor.
Go to police department and desk guy about Moseley, crime scene and photographs. Open up photograph package and look.
Go to map and go to grandma's house. Go right up to attic. Get sketchbook and open.
Use clock, put the clock to dragon and change time to 3 o'clock. Use the key on the side and pick up picture and letter. Look at both things in inventory. Go downstairs to grandma, show her picture. Ask about Margaret Knight and Heinz Ritter. Ask about all the family and about schattenjager.
Go to cemetery. Pick up brick and use sketchbook on symbols on wall.
Go to park. Get mime to follow you to cop and use motorcycle when cop chases mime.
From map go to crime scene. Sketch the pattern. Pick up clay. Use magnifying glass on grass until you get the snake scale. Use tweezers on scale. Look at scale with magnifying glass in inventory.
Go to napoleon house. Ask about voodoo, bar patrons, Sam and Sam and voodoo.
Go to police station. Ask Mosley about pattern around bodies and other six patterns. Exclamation mark on Sgt. Franks and ask for file. Look at file. Put file back on her desk. Go back into Mosley's office and talk about photographs. Ask for a cop/author photograph. Then say to hold on while you check your hair. When you are out by the desk, pick up pictures and make a copy of them. Put file back on Frank's desk.
Go back to bookshop and ask Gracie to do research on Malia Gedde. END OF DAY
DAY 2
Read newspaper.
Go to voodoo shop and listen to madam Cazaunoux. Ask shop owner about her, but won't get any answer.
Go to voodoo museum. Ask about everything. Ask about historical voodoo x5 until point given. Ask about Marie Laveau x6. Ask about current voodoo x2 and get moonbeam's address.
Go to cemetery. Ask about Marie Laveau. Ask about other marked tombs.
Go to Jackson Square Park and watch painter lose his picture. Give coupon to hotdog salesman. Give hotdog to dancing child. Ask child to do you a favor and get picture. Give picture back to painter and give him BOTH pictures of the symbols you have. (The one from the crime scene and the copied symbols from Sgt. Frank's desk).
Go to church. Open door at the back and pick up priest collar and black priest robe.
Go to moonbeam residence. Show her the symbols that were on the tomb and have her translate. Ask about St. John's Eve. Ask about snakes. Ask about everything, ask about Grimwald her snake, and ask her to show you how she handles Grimwald. When you get the cursor back, put hand on snakeskin and take it. Use magnifying glass on snakeskin in inventory.
Go to police department. Watch man fixing thermostat. Use the thermostat and turn heat up to 90. Ask Mosely for coffee. While he is gone, pick up his badge from coat.
Go to Gedde estate. Ask to see Malia and say you have official business and show butler the badge. Ask Malia about everything and flirt with her last, and you will get kicked out.
Go to police station and give badge back to Mosely.
Go back to bookstore and ask Gracie to do research on Madam Cazaunoux. END OF DAY.
DAY 3
Read paper.
Look at phone book in inventory and see A. Cazaunoux. 555-1280. Go to bedroom and use phone and call her.
Talk to Gracie about messages and she gives you a phone number for Wolfgang.
Call the Cajun critters. 555-6170. Ask about madam Cazaunoux and tell them you are worried about dance lessons for Castro.
Call Uncle Wolfgang. 49-09-324-3333
Go to Park and get pattern from painter.
Go left and see the fortuneteller. Look at her and ask about snake and want to know more about snake. When she dances, put hand on her. Pick up scarf. In inventory put magnifying glass on scarf and look until you see that you have a snake scale on the scarf. Use tweezers on scarf and get green snake scale. Use magnifying glass on snake scale. Given scarf back to fortuneteller and watch scene.
Go to Tulane University. Show picture of murdered person to professor. Show him the pattern you got from painter. Ask about cabrit sans cor and find out what it means. Then ask him about everything.
Go to grandma's house and ask about Wolfgang Ritter.
Go to voodoo shop. Ask about animal masks and Willie Jr. You need 100 dollars.
Go to madam Cazaunoux house. Put on hair gel and black priest outfit. Use door and get in telling her you are the priest to see her. First talk about cabrit sans cor to her and tell her that it means goat without horns. Ask about human sacrifice, real voodoo queens and then voodoo hounfour. While the snake is in the side picture, use the clay on the snake to get an impression of it.
Go to bookstore and drink coffee. The guy comes in and wants to buy the picture. Ask him how much he would give you for it, tell grace to stay out of it and let him buy it.
Go back to Dixieland drug store and give him the 100 dollars and get some lucky gambling oil and the alligator mask.
Go to police department and watch Crash. Ask Mosely about case status.
Go to Napoleon House and give gambling oil to Sam. Powerful voodoo oil, nun get lucky, Markus wins every time. After Sam wins, give him the clay snake impression
Go to Jackson Square Park. See fortune teller and put exclamation on her and hear what she says.
Go to cemetery and back to Gedde tomb and watch cut scene with Malia. END OF DAY
DAY 4
Read paper. See man outside window.
Ask Grace about research of a pattern that you have.
Go to Jackson square overlook and use left binoculars and see crash.
Go to police department and ask Mosely about case status and to reopen the case.
Go to napoleon house and get bracelet.
Go to church and see crash in there. Show him the bracelet first and ask about drummer first. Ask him about everything except the hounfour, ask that last. Put eyes on Crash and then lift up shirt and make a copy of the tattoo with your sketchbook. END OF DAY
DAY 5
Read paper. Ask grace to do research on rada drums.
In inventory, open up gray book and read it and also open up letter and read it and look at newspaper clipping.
Go to Tulane University. Pick up paper on desk.
Go to museum and be quick…. USE the switch on wall to get rid of snake. Go back to bookstore and Grace will take off a snake scale. Pick it up from the ashtray with tweezers. Look at snake scale in inventory with magnifying glass and he puts them together. Look at twin snake scales with magnifying glass.
Go to Police department and give Mosely the snake scales, give him the pattern that painter did and the pattern that you picked up from desk at Tulane university. Give him the newspaper clipping. END OF DAY
DAY 6
Watch cut scene and pick up letter that comes through door. Open envelope and open letter in inventory and look at key. Look at rada drum book in inventory.
Get ready for Teen Titans Go! Figure - the epic follow-up to the breakout hit game Teeny Titans. Someone’s trying to put Teeny Titans out of business! Battle your way to the bottom of this mystery. CHALLENGE YOUR FRIENDS The Multiplayer Beta is here! You’ve faced the world’s greatest heroes. Now, challenge your friends to teeny battles! Rank up to unlock Legion of Doom figs. Cartoon Network is home to your favorite cartoons, full episodes, video clips and free games. Play with your favorite Cartoon Network characters in Teen Titans GO! Games, Adventure Time games, Regular Show games, Gumball games and more. Watch episodes and video clips of your favorite TV shows like Adventure Time, The Amazing World of Gumball, Regular Show, Ninjago, Teen Titans GO!, Steven. Teen titans go figure game.
Read paper.
Go to cemetery. See second voodoo message and copy it. Combine the two messages.
Go to Jackson Square Park and put rada drum book on drummer. Translate it to say call conclave, tonight, swamp. Talk to beignet guy until you finally tell him that he should go back to Royal and Conti. Put the key to Mosley's office in the inventory window so you can use it fast.
Go to police department and the beignet guy comes back there. After the desk sergeant comes back ask the sergeant where Mosely is and when he starts nodding his head, quick use the key on the door and go in the office. I found out that if I get caught the first time by the desk sergeant, I had to ask him again where Mosely was and then wait for him to nod off. In Mosley's office, open desk drawer and get tracker.
Go to voodoo museum and put one of the trackers in the sekey madoule.
Go to cemetery and after the yard man leaves and write message on tomb using red brick Write DJ BRING SEKEY MADOULE making sure you use as many letters from the first page as you can. The U is from the word “BUT” and the M is from the last letter on the first page from the word “harm.” Don't use the S from the second sheet for anything.
Go to book store and get Gracie to paint the snake tattoo on you, say costume party and she is jealous. Go to swamp (bayou) and use the tracker and keep following the bleep spot until you get to the conclave. Put the alligator head on and when dr. John asks questions say damballah and ogoun badagris. END OF DAY
DAY 7
After cut scene call Wolfgang. Talk about Tetalo, talisman, tetelo's remains, African homeland, well, ask him everything.
Read paper
Go to cemetery. Go into gedde's tomb and use flashlight on middle drawer and open middle drawer and see Mosely in drawer. After you wake up use flashlight again on drawer, open it, and get wallet. Leave tomb, open wallet in inventory and look at card.
Go back to bookstore and call the travel agency 585-1130 and use Mosley's American repressed card to get to Germany.
In Germany, go to the right and look at the panels. Go out and ask Gerde what the chapel panels means and then the initiation ceremony. You can ask her other things too, like her relationship with Wolfgang etc. Take dagger from wall.
Take saltshaker under Gerde.
Go up to room and take knife, bowl, scissors, and scroll. Open window and use the snow in the window.
Use scissors on Gabriel to cut his hair.
Look at the portal above the library doors.
Go downstairs and ask Gerde about portal poem. Go to the right and put the bowl (chamber pot) on the altar. Put salt in bowl. Use dagger and cut Gabriel. Kneel (USE) on the alter and put the scroll on Gabriel. Watch cut scene.
DAY 8
Pick up key at end of bed and use the key to get into library.
Look at all the books on both sides of the library. In the middle shelf on right see the People's Republic of Benin. Pick it up. It tells you to look at the book called The Primal Ones. Find that on the right side of library, very right shelf. Pick it up and read it. It tells you to look up Ancient Roots of Africa. You can find that on the left hand side of library, pick it up and read it. It tells you to find Sun Worshippers. That is on the right hand side of library, the left shelf on the top. That book tells you to look up Ancient Digs of Africa. That is on right side of library, the far right shelf on the bottom. That tells you about the double snake ring.
Go downstairs and show Gerde the key and the book. Tell her that is where Wolfgang went and use the American repressed card to pay for it. END OF DAY
DAY 9
Go around the whole maze and pick up every tile that you can and also pick up the blue rod. There are 12 different rooms, so after you see the tile that is stuck with 12 worms on it, the next room up would be #1. Put the tile with only 1 worm on it and keep on putting the tiles in order. After that is done, go to room #3. Put the blue rod in your window of inventory and SAVE YOUR GAME. Put the blue rod into the tile. After you get your movement back, wait a couple of seconds and then run upwards to the room with the vines hanging down and USE the vines to swing. After seeing Wolfgang, use the blue rod in the tile behind you. Keep looking at the round altar table until Wolfgang reads the picture. Use hand on the two rods on the wall and put them on the round altar. Use the two rods to try and open it. Wolfgang tells you to get a heart from the dead guy. Use your knife on the dead guy and see Wolfgang take his own heart out. Watch cut scene.
Go to bookshop. Read paper. Read letter on desk. Talk to Mosely about grace, about making a plan, fill him in and have him fill you in.
Go to church and put the blue rod in the knothole in the wall of the confessional. Put blue rod under the bench. Put tracker under the bench. If you have 303 points here, you will get the extra point at the end of the game.
Use the door and go up to door with a T and 2 dots. Pick up the two costumes. Go up to the room with two T's and see the animals. Go up to the room with just two dots. That is Dr. John's room. Turn around right away and leave. Go up to the room with four dots and pick up black book from desk. Take any passage to the right and use the drums. Use both books, the first one to say “summon” and the next book to say “ brother eagle” take the passage to the right and go to dr. John's room and pick up key from wall. Use key to open up door with one dot and pick up all the money you can. Go down to room with two T's and one dot and see dead man on table. Go down to room with One T and three dots and see Gracie. Put talisman on Grace. Give boar costume to Mosley. Put wolf costume on Gabriel.
When you are in the middle of the ceremony, put talisman on Malia. Throw talisman to Mosley. Put hand on the statue inside the round alter. Put hand on Malia to try to save her. Watch end scene and you should have the extra point. 343 instead of the usual 342.